Showing posts with label sewing. Show all posts

Tuesday, March 29, 2011

HSN fabric projects!

I was asked to work with some fabric by Riley Blake Designs and the Xyron Creatopia to make projects for HSN.  The fabric is adorable and I had a lot of fun working with it!
Here's what I made:


I made this first because I had to make something for a boy!  Everyone makes projects and clothes for girls and there's so little out there for boys.  It's a real bummer when you have four sons and no daughters :)  I like to have cute stuff for my kids too!  I drew the tie myself and cut it out, then added the Xyron Fabric Adhesive to it so it was like a big sticker.  Once I had it where it needed to be I just did a quick zigzag stitch around the edge.


To go along with that, I made a little girl's t-shirt into a dress.  My ruffler foot came in pretty handy on that skirt :)  I got to use my Xyron Fabric Adhesive on the flower applique and on the ribbon that I added.  It makes it so easy!  I didn't hem the skirt, I just serged the edge.  I like that it looks a little rough.


The last project I made was this little wall hanging/doll quilt.  I used the fabric adhesive for the hearts that I appliqued onto the white squares.  And those hearts?  Cut them out using a Spellbinders Die made for Xyron.  It's really cute in person :)

Be sure to keep an eye out for the Xyron Creatopia on HSN tomorrow and let me know if you see any of my stuff!

Wednesday, January 26, 2011

Grab Bag!

While cleaning my crap room, I found this pattern that I'd printed out a while ago.  I have a lot of printed out patterns and instructions for making mini albums and projects like that but I keep most of them together in a binder so I can grab the whole thing and look through it.
The pattern is from All People Quilt and I obviously thought it was cute when I found it the first time. :)  It's a pretty quick and easy bag to put together and I think it's neat that it gets held a little differently than your average bag.

 I found this fabric for the outside as a remnant at Hobby Lobby and it was only a little over $3.  I already had the black fabric for the lining and used a little leftover quilt batting for the padding so it was a pretty cheap bag!  I also had the flower already (got that at Hobby Lobby too) and thought it made a cute addition to the bag.

This is what it looks like when it's open and plain.  The long handle slips through the short handle and you carry it by the loop that sticks through.  It has six little pockets on the inside too. 

I actually made this bag to take with me this weekend.  I'm actually going out of town...to CHA!!  WOOHOO!  I am so excited that I get to go to the show.  I'll be doing make and takes in the Xyron booth and helping in the Xyron classes, but I'll have a break every day to go look around and drool on everything.  I'm taking my camera, but not my computer so you'll have to wait until Tuesday to see the pictures because I don't come back until late Monday night.  I'm leaving Friday morning and I'm totally geeking out about it.  If there's a booth or product you want to see, let me know!  I'll try to do some pictures and videos from my phone as well and they'll upload to my regular Facebook profile. 

Have a great weekend everyone!

Sunday, January 9, 2011

More gifts!

I didn't share these because one of them wasn't actually done until the day after Christmas :) Oops! Sometimes things just get a little too crazy around here and those extra projects fall to the side.
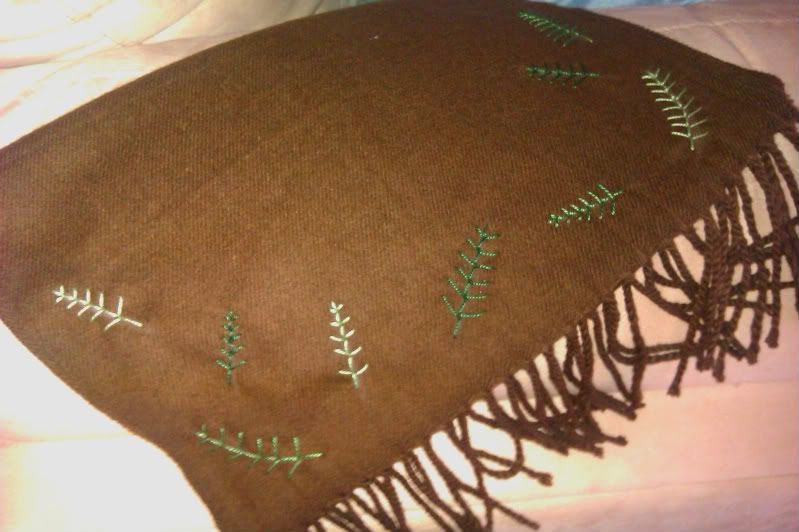
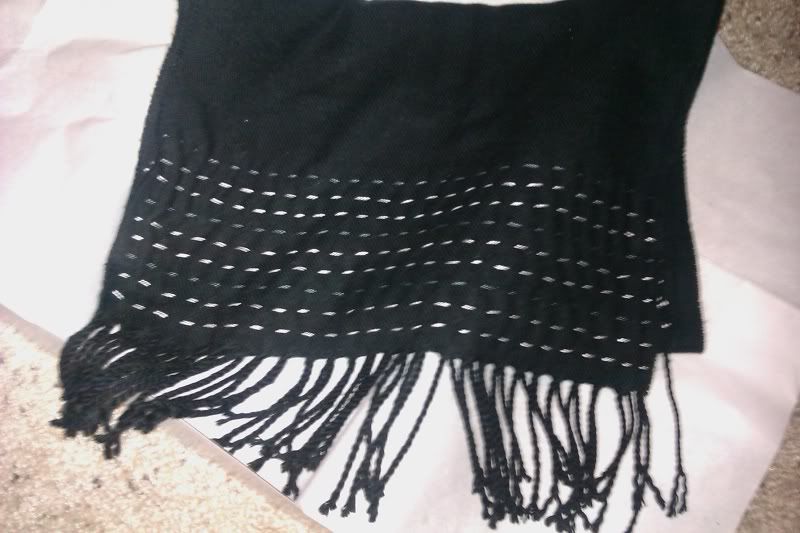
I made these as gifts for a couple of people. I bought the actual scarves at the quilt show I went to in Houston. They say that they're cashmere, and who knows if that's true or not. They are very soft and pretty so that's what counts. I picked up some of the thicker embroidery threads and added stitches I saw in a little book I picked up for $2 at Half Price Books.
These are the result! (please forgive the cell phone pictures)


This one I made for a friend.  It didn't take too long and I think the leaves are pretty.  The one in the book also had little sequins on it, but I didn't think they'd stay on very well so I just did the leaves.


This is the one I did for my mom.  It took longer, and the lines were difficult because when you're sewing in a hoop it's hard to see whether you're keeping the stitches straight or not.

Anyway, these were pretty easy and quick to make and I think they're great gifts.  I know I'd appreciate getting something that's useful and pretty and it's nice to know that someone spent time making something just for you.

Thursday, November 11, 2010

Ditch those plastic veggies bags...

This week Glue Arts and May Arts have teamed up.  I had so much fun playing with their beautiful ribbons!  The first project I made were these muslin veggie bags.  I hate to use the ones at the store and just throw them away and I've been meaning to make some for a while now.  Once I had the ribbon I knew that it would be fun to embellish them a little.  There are so many colors and types of ribbon that you could use a different one for each kind of veggie so you'd know what was in the bag before you opened it :)
Supplies:

Glue Arts Glue Glider pro with Fabri-Tac refill
May Arts ribbon of choice
May Arts cream colored rope
2 muslin squares that are 10" by 15" for each bag
Sewing machine and thread
Scissors
Iron
Fray stopping liquid
Instructions:

1. To make the bag, press in 1/4", then 1" on the top of each muslin piece. This will be the channel that the rope runs though. Sew along the channel bottom, leaving the ends open for the rope to pass through.

2. Sew along the sides and bottom of the bag, avoiding the channel. Turn bag right side out and press.

3. Run a 36" length of rope through the channel and the the ends together in a knot. Add fray stopper to ends of rope. The finished bag will look like this:

4. Wrap a piece of ribbon around the bag to measure the length that needs to be cut to wrap around it. The ribbon should be long enough that there is at least 3-4 inches that overlaps. Attach the ribbon to the bag with the Glue Glider Pro and Fabri-Tac refill, leaving the overlap alone.


5. Take the overlap at fold it into a loop. Attach the loop to the bag with more Fabri-Tac adhesive.

6. Cut a 2-3" piece of matching ribbon and use the Fabri-Tac to attach it to the bag, looped around the seam where the ribbon meets itself on the bag.


7. Heat set the adhesive following package directions.


I'll post the other May Arts/Glue Arts project tomorrow. 

Saturday, October 30, 2010

My latest quilt!

A friend sent me a blog link to this pattern and I immediately knew that I wanted to make it and that it would be great to use the Xyron fabric adhesive to hold those circles in place while I sewed them down. First, go check out this great blog with all the patterns and ideas! 


I have got to make a cover for my camera strap and I think her tutorial will be great for that.
Now, check out my quilt....

This was much easier to make than I thought it might be.  I was afraid that cutting everything out and matching up the pieces once I cut up the blocks would take forever, but I got the whole top done in a day.  I love that it frays a little after you wash it too.

Wednesday, October 13, 2010

A few quick quilt pics!

I said that I'd post the quilt once I finished the binding and took pictures, so here it is!

This is it, all finished.  I think I like it, and I would really like to take an intermediate class and learn more about quilting.  I need practice for sure, but I still think I'm missing something when it comes to getting my seams perfect.  I want to be able to make blocks with triangles!


 For the binding, I picked my favorite fabric of the bunch.  It's a pretty funky, modern one and I love it.  If I get to make other things for this room and need to buy something, this will probably be what I choose.

When I originally bought this fabric for the quilt, it was still full price.  When it was time to buy the backing it was half off.  Woohoo for that!  I usually just use muslin, so this is a treat.  My quilt is pretty on both sides :)

Tomorrow I'll be posting about a way to decorate for Halloween on the cheap!  See you then!

Tuesday, October 5, 2010

Xyron+Fabric+Store Bought Purse=CUTE!


To show off the Xyron Fabric Adhesive for the Creatopia, I decided to alter a simple purse that I found at Target a while back.  You could buy and fabric purse (this one cost under $10) and choose from your own fabric scraps or use fat quarters to embellish it!
Pre-wash all fabrics before using.
Cut circles in different sizes out of the fabric(s) you choose using pinking shears.
Run the circles through the Creatopia with the Fabric refill.
Bunch the circles up as you place them on the purse to get a flower shape.  You can readjust until they're just how you want them because this isn't a permanent adhesive.
Sew circles or lines through the center of your flowers to permanently attach them to the purse.
And sew button centers onto the flowers.

Thanks for looking!

Tuesday, September 21, 2010

Family wreath and instructions

I made this wreath recently for Xyron and I have been asked to share the directions so here they are!  I had to send this one in, but I might just need to make another one for my house :)
Family Wreath by Jessica Barnett


Supplies Needed:


Xyron Creatopia with Fabric adhesive refill and Permanent adhesive refill

6 or 7 assorted fat quarters in black, cream and beige

Scrap of fabric in cream pattern

Charm pack or assorted fabrics in approx 5” squares

Small wooden spools

Chipboard circles

Spool of gathered black ribbon

Scraps of coordinating patterned paper

Small (1/2 inch) white buttons

Large (1 inch) black and white buttons

Jute twine

Black and cream threads and needle

Sewing machine

Scraps of quilt batting

Metal “Family” sign

Scissors

Rotary cutter and mat

Black paint and brush

Hot glue gun and glue sticks

Circle templates

Pencil

Three black and white photos sized to fit the chipboard circles

Iron and ironing board

MDF wreath Form


Instructions:

1. Press all fabrics. Tear 2.5 inch wide vertical strips from the fat quarters with the long side of the fabric facing you. Tie the fabrics in knots on the wreath form alternating the knots on the inside and outside of the form.

2. Choose 10 of the squares from the charm pack and cut the largest possible circles from them. Sew the circles into yo-yos.

3. Choose four more fabrics from the charm pack and run them through the Creatopia with the Fabric cartridge. Fold the corners of the squares to the center and press to help hold the shape.

4. To make the flowered quilt squares, cut six, 5” squares from the cream patterned fabric and three, 4” squares from the quilt batting. Choose three fabrics from the charm pack and cut an irregular flower shape from each in a small, medium and large size. Run the flower shapes through the Creatopia with the Fabric cartridge. Layer the squares with a 5” square on bottom, then batting, another square and the three flowers from largest to smallest. Pin the squares and batting together to keep it from shifting while you sew. Sew through all layers around the edges of the flowers in black thread. Go around the square, ½” in from the edges in a cream thread. Fray the edges of the squares by pulling out threads on all sides. Use black thread to sew a large black button in the center of each flower.

5. For the photo circles, use a pencil to trace the circle shape onto the pictures. Cut out the pictures and run through the Creatopia with the Permanent Adhesive cartridge. Attach the pictures to the circles and trim any excess from the edges. Paint around the edges of the circles and pictures and allow to dry. Once dry, hot glue the ribbon to the back of the circle to add a little ruffle detail.

6. Cut strips from scraps of paper to fit the middle sections of the spools. Run the strips through the Creatopia with the Permanent Adhesive cartridge and attach to the spools.

7. To make the garland, string spools onto a piece of jute and tie scraps of fabric in knots between them. Hot glue jute-tied buttons over the fabric knots. Tie the garland to the wreath from.

8. Hot glue smaller white buttons to the metal word for the wreath.

9. Begin laying out the wreath by placing the larger items first, then layer and add the smaller items. Try to leave some space free so that the metal word will still be readable and won’t cover up too many of the wreath elements.

10. Hot glue the decorations to the wreath, including the metal word. Add some twine to help hold the wreath in place and cover it with buttons. Fill in any small blank spots with more buttons or spools.

Thanks for looking!!

Wednesday, September 15, 2010

Qulting!

This month I am taking my first quilt class!  I have been making quilts for a while, but never quite knew what I was doing.  My blocks were always different sizes and nothing ever matched up.  Frustrating!  I've wanted to take a class for a long time and this month I got to do it!
This is the pattern they're teaching this month.  It's called Flower Power.

The only problem with this quilt is that those flowers just don't do it for me :)  I'm making it to go in a guest room, but I still didn't want them on the quilt so I am leaving that row of flowers out (and saving myself a TON of work) and I just added another row of the blocks and a border instead.  The colors I'm going to put in the guest room are a sort of baby blue and red.
Here's my quilt top so far!
And because the color is a little wonky in that one, here's a close up of part of it
Thanks for stopping by!

Friday, September 10, 2010

Blog Hopping for Glue Arts!!

Woohoo!
So, things are changing up a little in Glue Arts land :) There are four brand new team members that we need to welcome. As you visit the blogs, you'll get to know them. You'll want to visit every blog in the hop because you have a chance to win at each stop just for commenting! And just what will you win?

A Glue Glider Pro and the refill of your choice!
This is one of my very favorite scrappy tools. The Perma Tac is my favorite cartridge, but I have been LOVING the new fabric refill too.
There are 12 chances to win a Glue Glider Pro and refill, and there's a bonus chance to win the GGP, a refill AND some of the new Extreme Adhesive Squares! How to you try for that bonus chance? Just email the names of the four new DT members to Gluegirl@gluearts.com for your chance to win! Be sure to comment and send in the email by Sunday for the chance to win. The announcement will be made on Monday.
I'd just like to share a few of my favorite GA DT projects. The instructions can be found over at GlueArts.com.
My most recent fave are these aprons that I whipped up and embellished using the fabric adhesive.

These were so fun to make (and the girls that I made them for loved them). A little secret? I made my boys model them for the pictures. They weren't as impressed :)
I really loved making this winter themed layout last year. I'm in AZ, so we had to travel to go see the snow. Those pics are so fun to scrap! And all the little buttons and bits that I stuck on here aren't going anywhere!

It's just about time for more projects like this! Halloween and fall are so fun to decorate for, and I loved the way this project came out. With the Wall Art adhesive I got to attach the little flying bats to the wall for the holiday, and they popped off the wall without leaving a mark when I was done!

Well, that's it for me! Next, go stop by Patti's Blog.
Happy Hopping everyone!