I LOVE potato soup. I worked at Bennigan's for years and would eat a little every morning for breakfast before we opened. It was a go-to food for me when I was pregnant and nauseous. I had really been missing that good stuff when all the Bennigans' around here closed down. I tried other soups at grocery stores and restaurants, but they weren't as good. (I worked at Black Angus for years too and their potato soup is just watery and gross. I never understood why so many people came in for it). I really missed that soup when I was pregnant with my youngest son.
Recently a girl on one of the forums I belong to shared this recipe with everyone. I decided to try it, but didn't have high hopes because I'm a freak and I like my soup to be really creamy without any dried out/rock hard bacon bits and without any leathery potato skin in it and that's all I seemed to be able to find out there.
Well...THIS STUFF IS DELICIOUS. Holy cow. If you like potato soup (and would appreciate a really easy recipe that even uses pre-cut potatoes to save you time), this is the stuff for you.
Cream Cheese Potato Soup
6 Cups water
7 teaspoons chicken bouillon
2 (8oz) packages cream cheese, cubed
1 package frozen hash brown potatoes
1/2 Cup chopped onion
1 teaspoon garlic powder
1 teaspoon dill weed
Combine water and bouillon, add cream cheese. Cook and stir until cream cheese is melted. Stir in remaining ingredients. Simmer uncovered 20 minutes or until veggies are soft.
I actually like to start it earlier in the day and just leave it on low and let it thicken up before dinner time. It's so easy and everyone that I've made it for seems to like it too! I serve it with chives, cheese, oyster crackers and bacon bits on the side so everyone can add what they want to their bowl.
Enjoy it now while it's nice and cold outside :)

Tuesday, November 23, 2010
Saturday, November 20, 2010
Busy!
I can't show everything I've been working on, but here's a pic of something that's been keeping me busy this week. :)
 I'll be sure to share pics of the whole to-do once it's all done, but for now here's a peek.
Also, this has been keeping me busy today...
 Gotta love pretty presents! I think I'll be putting the tree up this week so I can have the house decorated in time to host dinner on Dec. 4th. Then I'll have somewhere to put these!

Also, this has been keeping me busy today...

Friday, November 19, 2010
Is it just me...
or is the holiday craziness catching up to everyone else too? I know that it's early, but I'm trying to be caught up on as much as I can be early this year. I'm trying to buy gifts and work on decorations now so that when the holiday parties and dinners hit I'm not completely overwhelmed. Except that I'm overwhelming myself now :) Oh well. It still feels great to be getting things done around the house and I know I'll be very happy with how things turn out in the end.
Today I'm going to share the Glue Arts project I made this week. In keeping with my trying to stay ahead of the game, I decided to use these Crate papers to make the gifts for the teachers at the twins' school.
 Now I just need to do some snooping and find out what the teachers' favorite candies are so I can fill the jars with them!
The jars were purchased at Hobby Lobby (they had a half off sale on all their glassware so they were pretty affordable). One of the teachers is more girly than the other, so she's getting the one with the flowers on it. I had fun making these and I think they'll be happy with them. Much happier than they would have been if I would have waited and then let it get to be too late to make anything for sure :)
Today I'm going to share the Glue Arts project I made this week. In keeping with my trying to stay ahead of the game, I decided to use these Crate papers to make the gifts for the teachers at the twins' school.

The jars were purchased at Hobby Lobby (they had a half off sale on all their glassware so they were pretty affordable). One of the teachers is more girly than the other, so she's getting the one with the flowers on it. I had fun making these and I think they'll be happy with them. Much happier than they would have been if I would have waited and then let it get to be too late to make anything for sure :)
Monday, November 15, 2010
Holiday OCD
Those of you that know me well are aware of my craziness when it comes to party planning. I work on menus, guest lists and favors months ahead of time. I make lists, scour magazines and the internet for recipes and tear ideas out of the paper. When one of the girls at ScrapFreak posted a holiday journal project I knew it would be the best thing for me to make! This was so quick and easy to put together and I've been filling it with lists since I finished gluing everything down :)
 I bought a little album at Hobby Lobby on clearance for a little over $2. I took the binding rings out so I could cover it completely with the paper (which is gorgeous doily paper by Hambly). I used my Xyron to attach the paper to the covers because I know that no matter how much this thing gets used and taken in and out of my purse, the paper won't be going anywhere. The tabs that I added to the pages were just little circle die cuts that I made with my Spellbinders scalloped circle dies. I ran them through my Xyron, and folded them in half over certain pages to make the tabs.
Some embellishments, ribbon and silver mist spray finished it off.

Some embellishments, ribbon and silver mist spray finished it off.
Saturday, November 13, 2010
May Arts altered chalkboard
I was with the kids one day at the dollar store and saw these little chalkboards and knew they'd be fun to play with. I bought them thinking that I'd make one for each of the boys, but then I got all this pink ribbon from May Arts and Glue Arts and it looked like I was going to have to make one for myself :)


 Supplies:
Glue Arts hot glue gun
Glue Arts Ribbon Adhesive
Glue Arts Extreme Adhesive squares (small)
May Arts striped grosgrain ribbon (2 styles)
May Arts velvet ricrak trim
Small, wooden framed chalkboard
Needle and white embroidery floss
Scissors
Flower stamps (I used the Hero Arts Bold Blossoms)
Black ink
Small green buttons
Scraps of patterned paper in pink and green
Acrylic block
Instructions:
1. To make the large flowers, cut a length of the grosgrain ribbon that is 12-18 inches long. A longer piece will make a more ruffled flower. Make a running stitch along one side of the ribbon with the needle and thread, leaving a tail at the end.
 Once you've sewn along the edge of the ribbon, pull the string to gather it tight, still leaving tails at both ends.
 Tie the ends into a knot and trim the thread to make the flower.
 To make the smaller flowers, just fold the ribbon in half before running the stitch along the open edge.
 2. Add the velvet trim to the chalk board buy first running Glue Arts Ribbon adhesive around the frame, then attaching the trim to it.
3. Stamp the flower centers using black ink on patterned paper. The leaves should be stamped the same way, but on green paper. Cut out all images with the scissors.
4. Add the flower centers to the ribbon flowers, then add the flowers and leaves to the board using The Glue Arts hot glue gun.
5. Tie knots in the buttons with the embroidery floss and needle and use a small Glue Arts extreme adhesive square to attach them to the center of each stamped flower.
You can also add some of the ribbon to the back of the board and use it for hanging. I think I know some boys and girls that will be very excited to get these for Christmas.


Glue Arts hot glue gun
Glue Arts Ribbon Adhesive
Glue Arts Extreme Adhesive squares (small)
May Arts striped grosgrain ribbon (2 styles)
May Arts velvet ricrak trim
Small, wooden framed chalkboard
Needle and white embroidery floss
Scissors
Flower stamps (I used the Hero Arts Bold Blossoms)
Black ink
Small green buttons
Scraps of patterned paper in pink and green
Acrylic block
Instructions:
1. To make the large flowers, cut a length of the grosgrain ribbon that is 12-18 inches long. A longer piece will make a more ruffled flower. Make a running stitch along one side of the ribbon with the needle and thread, leaving a tail at the end.


3. Stamp the flower centers using black ink on patterned paper. The leaves should be stamped the same way, but on green paper. Cut out all images with the scissors.
4. Add the flower centers to the ribbon flowers, then add the flowers and leaves to the board using The Glue Arts hot glue gun.
5. Tie knots in the buttons with the embroidery floss and needle and use a small Glue Arts extreme adhesive square to attach them to the center of each stamped flower.
You can also add some of the ribbon to the back of the board and use it for hanging. I think I know some boys and girls that will be very excited to get these for Christmas.
Thursday, November 11, 2010
Ditch those plastic veggies bags...
This week Glue Arts and May Arts have teamed up. I had so much fun playing with their beautiful ribbons! The first project I made were these muslin veggie bags. I hate to use the ones at the store and just throw them away and I've been meaning to make some for a while now. Once I had the ribbon I knew that it would be fun to embellish them a little. There are so many colors and types of ribbon that you could use a different one for each kind of veggie so you'd know what was in the bag before you opened it :)
 Supplies:
Glue Arts Glue Glider pro with Fabri-Tac refill
May Arts ribbon of choice
May Arts cream colored rope
2 muslin squares that are 10" by 15" for each bag
Sewing machine and thread
Scissors
Iron
Fray stopping liquid
Instructions:
1. To make the bag, press in 1/4", then 1" on the top of each muslin piece. This will be the channel that the rope runs though. Sew along the channel bottom, leaving the ends open for the rope to pass through.
2. Sew along the sides and bottom of the bag, avoiding the channel. Turn bag right side out and press.
3. Run a 36" length of rope through the channel and the the ends together in a knot. Add fray stopper to ends of rope. The finished bag will look like this:
 4. Wrap a piece of ribbon around the bag to measure the length that needs to be cut to wrap around it. The ribbon should be long enough that there is at least 3-4 inches that overlaps. Attach the ribbon to the bag with the Glue Glider Pro and Fabri-Tac refill, leaving the overlap alone.
5. Take the overlap at fold it into a loop. Attach the loop to the bag with more Fabri-Tac adhesive.
 6. Cut a 2-3" piece of matching ribbon and use the Fabri-Tac to attach it to the bag, looped around the seam where the ribbon meets itself on the bag.
 7. Heat set the adhesive following package directions.
I'll post the other May Arts/Glue Arts project tomorrow.

Glue Arts Glue Glider pro with Fabri-Tac refill
May Arts ribbon of choice
May Arts cream colored rope
2 muslin squares that are 10" by 15" for each bag
Sewing machine and thread
Scissors
Iron
Fray stopping liquid
Instructions:
1. To make the bag, press in 1/4", then 1" on the top of each muslin piece. This will be the channel that the rope runs though. Sew along the channel bottom, leaving the ends open for the rope to pass through.
2. Sew along the sides and bottom of the bag, avoiding the channel. Turn bag right side out and press.
3. Run a 36" length of rope through the channel and the the ends together in a knot. Add fray stopper to ends of rope. The finished bag will look like this:

5. Take the overlap at fold it into a loop. Attach the loop to the bag with more Fabri-Tac adhesive.


I'll post the other May Arts/Glue Arts project tomorrow.
Wednesday, November 10, 2010
I'm back and I have a quick Thanksgiving craft for you...
My trip to Houston with Xyron was so much fun! It flew by and I was totally pooped when I got home, but it was really great. I have a few pictures of the booth (and my projects!) but first I'd like to share this quick, fun and (almost) free craft. I did have to buy a frame, but if you've got something laying around that you can use, this is one very inexpensive project.

The picture can be found for free here. I thought it was really cute so I printed it out at home on some cardstock. Yesterday I grabbed a matted frame at Marshalls and added a few embellishments to fancy it up a little. Voila! I have it sitting on a table in my front hall and I'll be bringing it out every year.
I only got a few pics in Houston, but I thought I'd share. When I went to take my camera out on the first day my batteries were dead! I didn't get any pics from dinner the first night, or of my nice hotel room or anything.
The booth was pretty nice. I liked all the color and there were cupboards and things for storage that were very handy. Nothing like not knowing where to put your purse, right? I had my luggage on me the whole time so it was especially nice to have somewhere to put it.
No pictures of me either! I'll have to see if I can get the one from the other person that took pics :)
I did do a little shopping (which kind of defeats the purpose of working at the show, but that's okay. Some of it was for Christmas gifts. They'll be another project that I'll share as I finish them.

The picture can be found for free here. I thought it was really cute so I printed it out at home on some cardstock. Yesterday I grabbed a matted frame at Marshalls and added a few embellishments to fancy it up a little. Voila! I have it sitting on a table in my front hall and I'll be bringing it out every year.
I only got a few pics in Houston, but I thought I'd share. When I went to take my camera out on the first day my batteries were dead! I didn't get any pics from dinner the first night, or of my nice hotel room or anything.
The booth was pretty nice. I liked all the color and there were cupboards and things for storage that were very handy. Nothing like not knowing where to put your purse, right? I had my luggage on me the whole time so it was especially nice to have somewhere to put it.
No pictures of me either! I'll have to see if I can get the one from the other person that took pics :)
 |
| Look at all that fun stuff! |
 |
| I recognize that wreath! |
 |
| There were women at this super fancy quilt show checking out my quilt! How cool is that? |
Wednesday, November 3, 2010
My jars...
If you've looked at the pictures of my scraproom of facebook, you know I have a thing for rainbow order :) I thought I'd add a little extra color and labels to my rain drops jars (but I think you could label just about anything this way).
![]() Supplies needed:
Supplies needed:
Glue Arts hot glue gun
Glue Arts Extreme Adhesive squares
Twinery twine in Lemondrop, Cappucino, Peapod and Caribbean
Scissors
Scalloped circle punch or die
1" circle punch
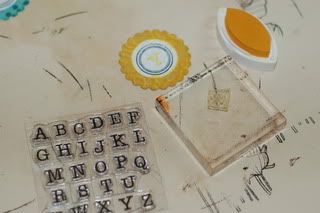
Small letter and circle stamps
Chalk inks in yellow, blue, green and brown
Paper scraps
Jars
Black ink
Instructions:
1. Attach a Glue Arts Extreme Adhesive square to the front of the jar.
![]()
2. Lay the end of the twine along the bottom of the square and start wrapping the twine around the jar. Keeping each line close to the last.
![]()
3. Wrap until the entire square is covered and trim end of twine.
![]()
4. Cut out scalloped circles with the die or punch, and punch out cardstock circles with the 1" punch. Ink the edges of all circles with the chalk ink.
![]()
5. Attach the cardstock circles to the scalloped circles using Glue Arts Extreme Adhesive squares.
6. Use the black ink to stamp a circle design onto each cardstock circle.

7. Use the chalk inks to stamp a letter or message onto the carstock circles, inside the black design.
8. Use the Glue Arts Hot Glue Gun to attach the labels to the jars

Thanks for stopping by! These are also up on the Glue Arts blog today, along with a few chances to win some great prizes. Be sure to go check it out!

Glue Arts hot glue gun
Glue Arts Extreme Adhesive squares
Twinery twine in Lemondrop, Cappucino, Peapod and Caribbean
Scissors
Scalloped circle punch or die
1" circle punch
Small letter and circle stamps
Chalk inks in yellow, blue, green and brown
Paper scraps
Jars
Black ink
Instructions:
1. Attach a Glue Arts Extreme Adhesive square to the front of the jar.

2. Lay the end of the twine along the bottom of the square and start wrapping the twine around the jar. Keeping each line close to the last.

3. Wrap until the entire square is covered and trim end of twine.

4. Cut out scalloped circles with the die or punch, and punch out cardstock circles with the 1" punch. Ink the edges of all circles with the chalk ink.

5. Attach the cardstock circles to the scalloped circles using Glue Arts Extreme Adhesive squares.
6. Use the black ink to stamp a circle design onto each cardstock circle.
7. Use the chalk inks to stamp a letter or message onto the carstock circles, inside the black design.
8. Use the Glue Arts Hot Glue Gun to attach the labels to the jars
Thanks for stopping by! These are also up on the Glue Arts blog today, along with a few chances to win some great prizes. Be sure to go check it out!
Subscribe to:
Posts (Atom)